Utilize Real-Time NestJS using Server-Sent Events
April 4, 2023
Have you ever wanted to send real-time updates to your clients without the need for a WebSocket connection? If so, then Server-Sent Events (SSE) is the perfect solution for you. In this blog, I'll show you how to implement this solution in a NestJS application.
What are Server-Sent Events?
Unlike WebSockets, SSE is a unidirectional communication protocol. This means that the server can only send data to the client, but the client cannot send data back to the server. This is a great solution for use cases where the client only needs to receive some data from the server, but not send any data back.
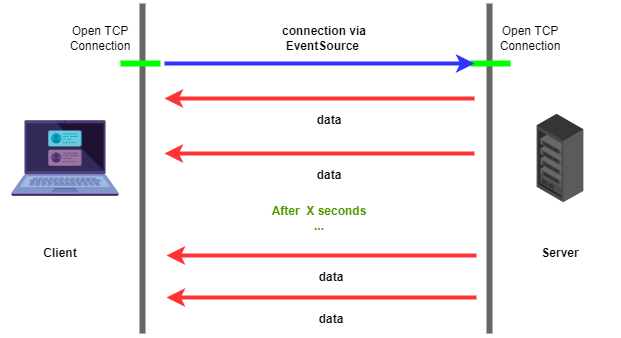
SSE is a part of the HTML5 specification and is supported by all modern browsers. It is also supported by Node.js, which makes it a great solution for building real-time applications with NestJS.
Setting up the NestJS server
Before diving into the implementation, let's set up a new NestJS project and install the required dependencies.
Prerequisites
Ensure you have the following tools installed on your system:
Creating a new NestJS project
To create a new NestJS project, first, install the Nest CLI globally on your system by running:
npm install -g @nestjs/cli
Next, use the `nest new` command to create a new project. Replace `nestjs-sse-example` with your desired project name:
nest new nestjs-sse-example
Follow the prompts, and choose the package manager you prefer (npm or Yarn). The CLI will generate a new NestJS project with the default structure and configuration.
Installing dependencies
Navigate to the project directory and install the required dependencies:
cd nestjs-sse-example
npm i
npm i --save @nestjs/event-emitter # for the event emitter
The default NestJS installation already includes the necessary dependencies, such as `@nestjs/core`, `@nestjs/common`,
and `rxjs`. No additional dependencies are required for this example.
Starting the development server
To start the development server, run the following command:
npm run start:dev
This will start the NestJS development server with hot-reload enabled. You should see the following output indicating that the server is running:
[nestjs] Starting Nest application...
[nestjs] Nest application successfully started
Now that the NestJS server is set up and running accessible at http://127.0.0.1:3000, we can proceed to create an SSE endpoint in `app.controller.ts` made by the Nest CLI as
a boilerplate.
The way I'm going to implement this example is by creating an SSE endpoint that pipes the triggered event of `sse.event` to the response stream using
`fromEvent` from `rxjs`. This way, we can trigger the event from anywhere in the application and the client will receive the data.
import { Controller, Sse, MessageEvent } from '@nestjs/common';
import { AppService } from './app.service';
import { EventEmitter2 } from '@nestjs/event-emitter';
import { Observable, fromEvent, map } from 'rxjs';

@Controller()
export class AppController {
  constructor(
    private readonly appService: AppService,
    private eventEmitter: EventEmitter2,
  ) {}

  @Sse('/sse')
  async sse(): Promise<Observable<MessageEvent>> {
    return fromEvent(this.eventEmitter, 'sse.event').pipe(
      map((payload) => ({
        data: JSON.stringify(payload),
      })),
    );
  }
}
The `@Sse` decorator is used to create an SSE endpoint. The `sse` method returns an `Observable` from `rxjs` that emits the `MessageEvent` object to the client.
The `MessageEvent` object contains the `data` property that is sent to the client. In this example, we are sending the `payload` object emitted by the
`sse.event` event.
The `MessageEvent` is imported from `@nestjs/common` and is not the same as the `MessageEvent` from the DOM API.
Now, let's go to `app.service.ts` and create a method that will trigger the `sse.event` event:
import { Injectable, OnModuleInit } from '@nestjs/common';
import { EventEmitter2 } from '@nestjs/event-emitter';

@Injectable()
export class AppService implements OnModuleInit {
  constructor(private eventEmitter: EventEmitter2) {}

  onModuleInit() {
    setInterval(async () => {
      this.sse();
    }, 3000);
  }

  async sse() {
    this.eventEmitter.emit('sse.event', {
      message: 'Hello from the server',
      randomNumber: Math.random(),
    });
  }
}
The `onModuleInit` method is called when the module is initialized. In this example, we are using it to trigger the `sse` method every 3 seconds.
Testing the SSE endpoint with a client
We're going to use a minimal Express.js that hosts static files to test the SSE endpoint.
Setting up the client
First, create a new directory called `client` and navigate to it and install express:
mkdir client
cd client

npm i express
Next, create a new file called `app.js` and add the following code:
const express = require('express');
const path = require('path');

const app = express();

// Serve static files from the public directory
app.use(express.static(path.join(__dirname, 'public')));

const port = 8888;

app.listen(port, () => {
  console.log('Server accessible on http://127.0.0.1:' + port);
});
This will start the Express server accessible at http://127.0.0.1:8888 and serve the static files from the `public` directory.
Next, create a new directory called `public` and create a new file called `index.html` in it. Add the following code to the file:
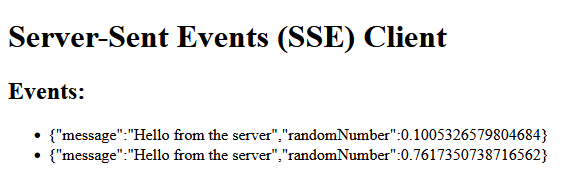
<!DOCTYPE html>
<html lang="en">

<head>
  <meta charset="UTF-8">
  <meta name="viewport" content="width=device-width, initial-scale=1.0">
  <title>SSE Client</title>
</head>

<body>
  <h1>Server-Sent Events (SSE) Client</h1>
  <div id="events">
    <h2>Events:</h2>
    <ul id="event-list">
    </ul>
  </div>
  <script>
    document.addEventListener('DOMContentLoaded', () => {
      const eventList = document.getElementById('event-list');

      const source = new EventSource('http://localhost:3000/sse');

      source.onmessage = function (event) {
        const data = JSON.parse(event.data);
        const li = document.createElement('li');
        li.textContent = JSON.stringify(data);
        eventList.appendChild(li);
      };

      source.onerror = function (error) {
        console.error('EventSource error:', error);
      };
    });
  </script>
</body>

</html>
This will create a simple HTML page that will connect to the SSE endpoint and display the received events in a list.
The `EventSource` interface is used to connect to the SSE endpoint. The `onmessage` event is triggered when the client receives a new event from the server.
You can read more about the `EventSource` interface here.
Running the client
To run the client, navigate to the `client` directory and run the following command:
node app.js
This will start the Express server and serve the static files from the `public` directory. You should see the following output in the terminal:
Server accessible on http://127.0.0.1:8888
Now, open http://127.0.0.1:8888 in your browser and you should see the following page:
Congratulations! You have successfully created an SSE endpoint in your NestJS application. You can now trigger the
`sse.event` event from anywhere in the application and the client will receive the data.
References
- https://blog.logrocket.com/server-sent-events-vs-websockets/
- https://docs.nestjs.com/techniques/events#dispatching-events
- https://developer.mozilla.org/en-US/docs/Web/API/EventSource
- https://developer.mozilla.org/en-US/docs/Web/API/MessageEvent
- https://developer.mozilla.org/en-US/docs/Web/API/Server-sent_events/Using_server-sent_events